
 This tutorial was writen by me: Dilcia aka DisyasDD, on September 26, 2010 from
my own ideas. Any resemblance to other tutorials is purely coincidental.
You may use this tutorial for personal use only.
To make this tutorial, you will not need any filter. Was made in PSP XI, but you could use with other versions.
Needed Supplies:
Disyas_COJ_FR4
Disyas_COJ_G1
Disyas_COJ_P4
Disyas_COJ_Tag1
Disyas_COJ_TB2
Tube of your choice
Note:
This materials are from my FTU kit "Christmas on July".
You can find it in Blog Trains sections in my blog:
http://disyasdigitalsdesigns.blogspot.com
The tube that i used is from the Artist Jennifer Janesko, called "The Gift",
you can buy it at: http://www.cilm.com
Please, dont forget to write in your tag your license number.
Let's go!!!
Step 1
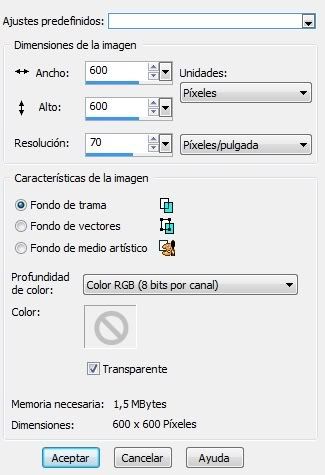
Open a new canvas, 600x600, transparent, 72pp resolution.
 Step 2
Open Disyas_COJ_P4
Go to Edit/Copy - Now you can close Disyas_COJ_P4
Go back to your canvas
Selections/Select All
Edit/Paste into the Selection
Deselect
Step 3
Let's go to apply some mask, use a default mask from PSP,
To do that, go to Layers/Load mask from disk
Choose a mask that you like and use the next settings:

Step 4
Open Disyas_COJ_FR4
Go to Edition/Copy
Go back to your canvas
Edit/Paste as new layer
We will rotate the frame to the left:
So go to Image, Free Rotate/Left/25º

Step 5
We will apply shadow to the frame, go to:
Effects/3D Effects/Shadow
We will use the next configuration:
1,1,50,10, Black, Shadow in new layer not selected

We will apply shadow again, just change the configuration for the next:
-1, -1, 50, 10, Black, Shadow in new layer not selected
Step 6
Open the Jennifer Janesko tube or the tube of your choice.
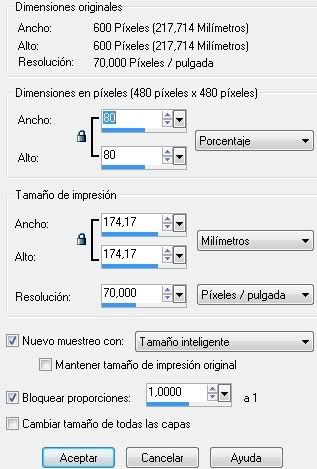
We will reduce the size of the tube 70 percent.
Go to Image/Resize/70%
Use the next configuration:
 Edit/Copy
go to your canvas
Edition/Paste as new layer
Now you can close your tube, don't save changes.
Step 7
We will rotate the image in the same orientation of the frame, so we will use the same configuration that you used in the Step 4.
Go to Layers/Organize/Move Down
With your Move Tool, move the tube and place it as you can see in the image preview.
Step 8 - Optional
Note: If the corner of the tube goes out of the frame, with our Erase Tool we will need to erase this part. Use in your Erase Tool the next configuration:
Circle, Size 32, Strength 100, Density 100, Opacity 100,
Sharp 100

Step 9
Open:
Disyas_COJ_TB2
Disyas_COJ_G1
Open Disyas_COJ_G1, go to Edition/Copy
Go back to the canvaz and go to the frame layer
Edit / Paste as new layer
Resize the gift 80% percent:
Image/Resize with the next settings:
With the Move Tool, put the gift in the place that you can see in the image.
Step 10
Open Disyas_COJ_TB2,
Edit/Copy.
Go to your canvas
Edition/ Paste as new layer
We will resize the Teddy Bear, you can use the same settings that we use with the gift in the Step 9.
Move the Teddy Bear back of the gift, go to
Layers/Organize/Send to Back
With your Move Tool, move the Teddy Bear to the position that you can see in the image.
Step 11
Apply shadow to the Teddy Bear and the Gift with the same settings used before in the Step 5.
Step 12
Open Disyas_COJ_Tag1
Edit/Copy
Go to your canvas
Edit/Paste as new layer
We will need to rotate the tag as we do with the frame and the tube.
Use the same settings that we use in the Step 4, just we will rotate 35º this time.
After that, apply shadow with the same settings used before.
Step 13
Now, add the text:
"Merry Christmas"
Set your foreground with the color: #f6ed8e
Set your background with the color: #961218
With you Text Tool and the next settings, write: "Merry Christmas":
font: Brush Script
Size: 54
Style: Bold
Aling : center
Stroke: 1

Note: You can choose other font. Depending the font of your choice, the settings could change.
After you write your text, go to the text layer, right click over the layer and select Rasterize.
We will rotate the Text using the settings that we use to rotate the frame.
Step 14
We will apply some shadow to the font, we will use the settings that we use in the Step 4.
We will apply some bevel in the Text too:
Effects/3D Effects/Inner Bevel
with the next settings:
 Step 15
To finis this tutorial add your cilm license number to your tag and your name too.
I hope that you have enjoyed this tutorial as i did.
No hay comentarios:
Publicar un comentario